Friday, May 31, 2013

Shopping For Window Treatments {What To Know}

If you are planning on going out and buying blinds or draperies for your windows the following information will be quite useful for you.

I currently work at a window treatment and bedding store that specializes in custom work, but also has in-stock items that can be purchased the same day in store. You would not believe how many times I've come across individuals that were so excited to buy window coverings only to find when they come to talk to myself or my colleagues that they are missing some vital measurements or information for us to set them up with the best possible product or to place their custom order.

So today I am going to share with you some questions that a sales person or design consultant may ask you, as well as some helpful tips on how to measure your window for both hard and soft window coverings.

1) How to measure your window for blinds:

You will need to take 3 measurements of the width, and length of your window, just like you see in this diagram; the reason for this is that there is no longer a "standard size window" there are always discrepancies, even by 1/8" (and yes that can make a difference when ordering custom). Another measurement you should take is the window depth, especially if you are planning on mounting your blinds inside of the window casing (measure from the nearest obstruction to the window opening if you want it to be flush).


2) How to measure your window for draperies:


When measuring for draperies you should measure the overall width of your window (the length as well if you would like the draperies to sit at the sill) as well as the ceiling height, and if you have rods already installed you should measure from the top of the rod to the floor for floor length draperies (or to where you would like them to sit). It is also helpful to note the amount of wall space on either side of the window; depending on the style of window covering you choose, some need an extra few inches of wall space to stack to the side to ensure that your view space of the window is uninterrupted.


3) How to hang your draperies:


When hanging draperies, there is no law on where you should hang them. However, within the interior design field it is an unspoken rule that you mount the drapery hardware as closely to the ceiling line as possible. One of the reasons for this is that it gives the illusion of a larger space and taller ceilings. As you can see in the picture above, it looks better and uninterrupted to hang your draperies this way.


4) Information you should have when looking for window coverings:

a) Are your walls cement or drywall?
b) Do you need privacy or light control (or both)?
c) Do you need thermal or acoustic regulation?
d) Do your windows have any obstructions (build outs on the casing, cranks, bulkheads,ect)
e) How do your windows open (into the room, out to the exterior, sliding)
f) Colour scheme (if possible bring fabrics from home, paint chips,ect to colour match)


Good luck and have fun with your search for window coverings, there's a wealth of options and information out there, but as long as you are prepared I promise it will be easier and less stressful.


Take Care,

Leanne.


Note: These drawings and diagrams are not of my own creation; for further information and original images please follow the links posted.

Thursday, May 30, 2013

Vegan Peanut Butter Pillows {Cookies}

I've been curious lately about the hype behind a vegan lifestyle and the foods that vegans can and cannot eat. I am not going to lie, I used to think that since vegans didn't eat anything from an animal (ie. butter, milk, cheese, eggs, meat,ect.) that the foods that they could eat may not be as tasty...boy was I wrong.

There are plenty of delicious vegan meals and desserts that taste just as good as non-vegan meals.

Here's a recipe for "Vegan Peanut Butter Chocolate Pillows":


PPK’s Vegan Peanut Butter Chocolate Pillows (source)
makes 2 dozen cookies

Ingredients:
Chocolate dough:
  • 1/2 cup canola oil
  • 1 cup sugar
  • 1/4 cup pure maple syrup
  • 3 tablespoons non-dairy milk (I used soy milk)
  • 1/2 teaspoon vanilla extract
  • 1 1/2 cups all-purpose flour
  • 1/3 cup unsweetened dutch processed cocoa powder
  • 2 tablespoons black unsweetened cocoa or more dutch processed unsweetened cocoa powder
  • 1/2 teaspoon baking soda
  • 1/4 teaspoon salt
Filling:
  • 3/4 cup natural salted peanut butter, crunchy or creamy style
  • 2/3 cup confectioner’s sugar
  • 2 to 3 tablespoons soy creamer or non-dairy milk (I used soy milk)
  • 1/4 teaspoon vanilla extract
Directions:
In a large mixing bowl combine oil, sugar, maple syrup, soy milk and vanilla extract and mix until smooth. Sift in flour, cocoa powder, black cocoa if using, baking soda and salt. Mix to form a moist dough.
Make the filling. In another mixing bowl beat together peanut butter, confectioner’s sugar, 2 tablespoons of soy  milk and vanilla extract to form a moist but firm dough. If peanut butter dough is too dry, stir in remaining tablespoon of non-dairy milk. If dough is too wet knead in a little extra powdered sugar.
Preheat oven to 350°F. Line baking sheet with parchment paper.
Shape the cookies. Create the centers of the cookies by rolling the peanut butter dough into 24 balls. Scoop a generous tablespoon of chocolate dough, flatten into a disc and place a peanut butter ball in the center. Fold the sides of the chocolate dough up and around the peanut butter center and roll the chocolate ball into an smooth ball between your palms. Place on a sheet of waxed paper and repeat with remaining dough. If desired gently flatten cookies a little, but this is not necessary.
Place dough balls on lined baking sheets about 2 inches apart and bake for 10 minutes. Remove sheet from oven and let cookies for 5 minutes before moving to a wire rack to complete cooling.

I cannot wait to try these and I think they just might become my new favourite cookie! If you make them please let me know how they turned out, and if you had any modifications that made them better.
Take Care,
Leanne.

Wednesday, May 29, 2013

Fit Tips

In my search for tips on how to make losing weight even easier, as I am working towards my own goal of losing 10-20 lbs, I came across these helpful tips on making healthier choices and changing your lifestyle for the better.


I know a lot of these tips can be obvious, or no-brainers to some people ( I know I was aware of majority of them), but sometimes it helps to have it written down for you to remember.

If you make these small changes in your life, you will be well on your way to not only weight loss, but also towards a healthier lifestyle & longer life.


Take Care,

Leanne.

Tuesday, May 28, 2013

Laundry Never Looked So Good {Laundry Rooms}

Laundry rooms used to be dark and dank rooms filled with bottles of detergent and bleach, and piled high with buckets & baskets full of laundry. Not anymore...

Take a look at these laundry rooms and see the potential for beauty in even private task areas of your home.


This cute cottage like laundry room uses a simple design and adds charm by ditching the detergent bottles and clutter by placing items in decorative glass jars.


This rustic design  uses a tumbled rock backsplash and natural wood cabinets and floors with warm tones keeping this laundry room welcoming.


This classic styled laundry room is bright and fresh and uses a customized folding table to house the washer and dryer, while keeping the detergents and scrubbers hidden in decorative baskets.


For small spaces, try this hide-away laundry room; everything fits conveniently into a deep closet complete with storage cupboards and hanging space for drying your delicates.


Having a laundry room like one of these would make you want to show it off during your tour to new comers, rather than skipping it.

Take Care,

Leanne.

Monday, May 27, 2013

Ramen Noodle Salad

Summer is almost here, and with that comes the season for cold salads.

Here is one of my favourite summer time salad recipes for Ramen Noodle Salad; this recipe is similar to the ramen coleslaw recipe from Weight Watchers. 


Ingredients:

Directions:

1. Preheat oven to 350 degrees F (175 degrees C).
2. In a medium bowl, whisk together the oil, vinegar, sugar, ramen noodle spice mix, salt and pepper to create a dressing.
3. Place sesame seeds and almonds in a single layer on a medium baking sheet. Bake in the preheated oven 10 minutes, or until lightly brown.
4. In a large salad bowl, combine the cabbage, green onions and crushed ramen noodles. Pour dressing over the cabbage, and toss to coat evenly. Top with toasted sesame seeds and almonds.


This salad is really easy to make, and it absolutely delicious. Try it out and let me know what you think.


Take Care,

Leanne.


Friday, May 24, 2013

Change It Up {Interval Running}

Being able to run, and run hard for a solid 20 minutes is great and all, but it's been proven that your body will burn fat more easily when put under constant change.

With that being said, let me introduce you to my favourite kind of cardio: interval running.

For those of you who may not be familiar with interval running, it is when you run for a short burst of time, followed by a even shorter recovery period, and then repeated multiple times (this can also be done on an elliptical trainer, stationary bike, ect). 

For an example, see the interval running routine below:


When working out this way you push your body to it's limits by running at a high intensity, then you trick your body into thinking it's cooling down and just when your heart rate slows a bit you crank it back up there and push yourself back into high gear which results in more calories burned. You can also increase the incline or adjust your speed to give yourself more of a challenge.


Give it a try and push yourself to the limit, and get ready to sweat.


Take Care,

Leanne.

Thursday, May 23, 2013

Bringing Back Wallpaper

When someone says the word "wallpaper" there are usually 2 main thoughts that come to mind: 
1) Eww, wallpaper. So tacky.

OR

2) Oooh...wallpaper. So pretty.

That's right, you either love it or hate it.
 I find that sometimes half of the people who think they hate it, really don't hate it at all, they've just been looking for it in all of the wrong places where selection is limited and therefore cannot show the true potential and beauty of wallpaper. So let's take a look at some beautiful selections:


For people who either do not want to commit to the semi permanence of wallpapering their walls (renters and/or individuals with "commitment-phobia"), you can add interest to a room by framing wallpaper and turning it into art.


Make your room pop by using a bright and/or bold wallpaper to create a accent wall for your space. This not only creates visual interest to a room, but it also adds excitement to an otherwise boring space.


Cool idea using these scrapes of wood right? Imagine how much of a hassle it would've been to square all of that up and hammer it all into the wall (not to mention all of the holes in the wall to fill later if you tire of this look). That's why it's so great that you can achieve looks like a brick wall, concrete, or wood paneling like this one by using wallpaper. No muss, no fuss. 


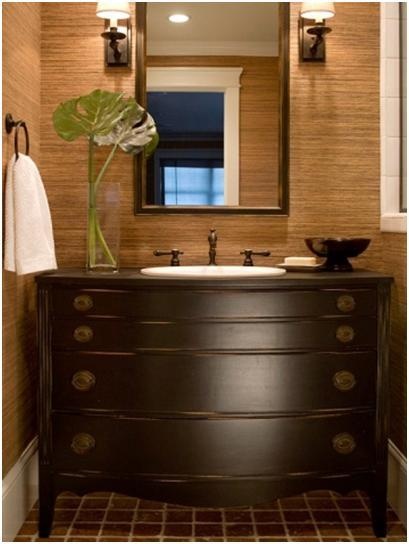
Add a natural appeal and warmth to a room by using wallpaper made from natural materials like in this washroom. Bamboo, grass-cloth or jute are some options of wallpaper made of natural fibers that are not only beautiful, but are also environmentally friendly and a sustainable product. Not only can you add depth and warmth to your room by using wallpaper made from natural fibers, but you can also help reduce your carbon foot print at the same time.


As you can see, wallpaper can be very beautiful, and is an easy way to update a room & add visual interest. You just need to look around past your local department stores and hardware stores to find some really cool stuff.


Take Care,

Leanne.


Wednesday, May 22, 2013

Crockpot Cabbage Rolls

For all of you cabbage roll lovers out there, here is a quick and easy (not to mention delicious)  recipe for crockpot cabbage rolls.

I made these for dinner over the weekend and oh my goodness were they amazing. I did all of the prep in the morning before I went to work, and came home after 8 hours to a delicious meal. I highly recommend these.

Here's the recipe:


Ingredients:
10 cabbage leaves
1/2 cup uncooked wild rice
1 egg, beaten
1/4 cup milk
1/4 cup minced onion
1 clove minced garlic
1 tsp. salt
1/2 tsp. pepper (I’m not a huge pepper fan so if you are increase to a tsp.)
1 lb. lean ground beef
Sauce
1 15 ounce can tomato sauce
2 Tbs. brown sugar
2 Tbs. lemon juice
2 tsp. Worcestershire sauce
Directions:
Boil a pot of water and add head of cabbage, cook for 2 minutes and drain. (You can freeze cabbage then thaw and skip the boiling part. We just need the leaves soft enough to roll)
Combine rice, egg, milk, onion, garlic, beef, salt, and seasonings in large bowl. Place 1/4 cup meat mixture in center of leaf and roll, tucking ends. Place seam side down in slow cooker.
Mix all sauce ingredients together and pour over rolls. Cook on low 8 hours in slow cooker


Take Care,

Leanne.

Tuesday, May 21, 2013

Lazy Day Fitness

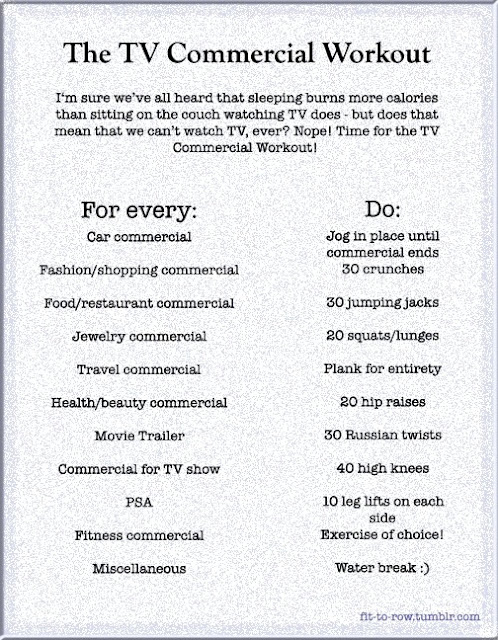
Some days, especially lazy days at home, it's hard to get motivated to workout (you're only human). You may have a comfy little "nest" area that you've made for yourself on the couch and are having a TV marathon and don't want to move from the TV (at least for a prolonged amount of time).

Here is a perfect workout for just that. A lazy day workout that can be completed in front of the TV and during those pesky commercials that you never really pay attention to anyway.


As you can see, this even breaks it down to different exercises for every type of commercial you have to watch to wait for your show. No excuses people. Have fun!

Take Care,

Leanne.

Monday, May 20, 2013

Let Patio Season Begin

It's the Victoria Day long weekend here in Canada. Across the country there are hundreds of thousands of people relaxing on patios enjoying the warm weather, and  attending backyard BBQs.

This made me think about how far we've come with the design of backyards and patios in the last 10 years or so. Look at these neat patio sets:


Isn't this lounge set to die for? So cozy looking. I would love to cuddle up on this on a summer afternoon to watch the sun set. 


This cocktail set is so trendy with it's bright pops of colour and geometric lines. Cocktail hour poolside just got more interesting.


The perfect set up: comfy couch with fire pit right off the beach. Can you imagine hanging out with friends with a cool drink in hand, or roasting marshmallows and making smores by the fire?


Have space limitations on your deck or patio, but still want a cute dining set? Problem solved with this bright and compact dining set, with benches that slide perfectly under the table.


I love all of these patio sets, and cannot wait until I have a house with a backyard so that I can design and have a beautiful backyard patio.


Take Care,

Leanne.

Friday, May 17, 2013

Secret Kiss {Forgotten Kiss Cookies}

It's Friday, you made it through the work/school week! Why not treat yourself to something sweet?

I came across this recipe for "Forgotten Kiss Cookies" from the Tasty Kitchen blog and can not wait to give it a try.


Ingredients:
1 Cup Softened Margarine
1/3 Cup Sugar
1/3 Cup Light Brown Sugar (packed)
1 Teaspoon Vanilla
2 Cups Flour
1 Cup Mini Chocolate Chips Or Mini M&ms
1 9oz. Bag Hershey Kisses
FOR CHOCOLATE DRIZZLE (optional):
¼ cups Mini Chocolate Chips
1 teaspoon Shortening

Directions:
1. Preheat over to 375 degrees F.
2. In a large bowl, beat butter/margarine, sugars, and vanilla until well blended.
3. Add the flour and blend until smooth.
4. Stir in mini chocolate chips.
5. Mold a scant tablespoon of cookie dough around each unwrapped kiss, covering completely. Shape into balls.
6. Place into un-greased cookie sheet.
7. Bake for 10-12 minutes or until set.
8. Cool slightly, move from cookie sheet to wire rack. Cool completely.
9. Prepare chocolate drizzle, if desired, and drizzle over each cooled cookie.
10. Enjoy!

Makes about 4 dozen cookies.
*Yes, you read it right: there are NO EGGS in this recipe.
To make chocolate drizzle: In a small microwavable bowl, place 1/4 cup mini chocolate chips and 1 teaspoon shortening. Microwave for 30 seconds to melt. stir until smooth. Drizzle over cookies.

These cookies look so good. A perfect treat for children's birthday parties, sleepovers, girls' nights, or just when a craving hits. I can't wait to make these.

Take Care,

Leanne.

Thursday, May 16, 2013

Dumbbell & Push Up Workout {Arm Routine}

I love working out with dumbbells. I've used them since I was 8 years old to do bicep curls, and then branched out to other exercises as I got older and more experienced in fitness.

This routine is great. Not only are you toning your arms by focusing on various muscle groups, you are also strengthening your chest and core with all of the push ups.


I hope you like this routine as much as I do. 


Take Care,

Leanne.

Wednesday, May 15, 2013

Amazing Swimming Pools

Spring has sprung, and soon people across Canada and the northern USA will be opening their outdoor pools for the summer months.

So I thought I would share some awesome swimming pool designs.


This multi-level swimming pool is jaw-dropping amazing. Starting with a hot tub that overflows into the large hourglass shaped pool, which then overflows into a small wading pool.


A sun bather's dream. This is genius; water attracts sunlight and can give you an even better tan (from personal experience). Why not take a dip, and take a tanning break on this contoured tanning slab in the center of the pool.


This is so cool. An underground cavernous pool complete with a water wall in the back corner and a rain shower in the ceiling.


This pool is from a hotel in Maui. With a rock bridge/waterfall suspended over the center of the pool, this simulates a tropical oasis.


I would love to have, or at least experience each and every one of these pools. How about you?


Take Care,

Leanne.

Tuesday, May 14, 2013

Better For You Fried Pickles


While looking through Pinterest I found this awesome fried pickles recipe. I don't know about you, but I love pickles! And fried pickles are so amazing; crispy and sour with an added crunch.

Here's the recipe:


"FRIED" PICKLES
Makes 6 servings.


Ingredients:
1 jar pickle slices
2 eggs
1/3 cup flour
1 Tbsp Worcestershire sauce
1 tsp hot sauce
1 tsp garlic powder
1 tsp Cajun seasoning
1 tsp pepper
1 1/2 cups panko bread crumbs


Directions:
Turn oven broiler on high.
In a medium bowl, whisk together eggs and flour. Add Worcestershire sauce, hot sauce, garlic powder, Cajun seasoning, and pepper. Mix well.
Place panko bread crumbs in a shallow dish. Dunk each pickle slice into the egg mixture, than dredge it in the panko bread crumbs.
Place coated pickles on a rack set above a baking sheet and sprayed with non-stick cooking spray. Place pan in the middle rack of the oven. Broil for about 3 minutes on each side.


No need to go to pubs and restaurants anymore for deep fried pickles. Next time a craving hits, I know what I'll be making.

Take Care,

Leanne.

Monday, May 13, 2013

Killer Buns & Thighs {Jillian Michaels DVD}

I'd like to introduce you to my new fitness obsession: Jillian Michaels' "Killer Buns & Thighs" DVD.

I had bought this DVD a few months ago, but due to my busy college schedule with all of my assignments piling up, I had not had a chance to crack into it and give it a shot. This week I decided to give it a try, and all I can say is wow!


I'm not going to lie, during the routine I thought "this isn't too bad". It was challenging but not the most  difficult routine I had ever tried (given I have just started level 1 of 3), but man oh man the next 2 days my legs burned. Anytime I had to bend or crouch down I could feel every muscle in my legs and butt.

I encourage you to give this a try. It's quick and effective, and can give you great results fast.

Take Care,

Leanne.

Friday, May 10, 2013

Less Is More {White Colour Scheme}

While at work today, I spoke to a very nice woman who was on the fence about painting her bedroom all white. As we spoke more I came to understand that it wasn't the colour itself that she was unsure of, but rather, the effect that painting all of her walls white would give to the room; would it be too boring? too bright? would it resemble a hospital or mental health facility?

The more I discussed the possibilities to avoid a sterile and cold feel to her room, and ways to add colour in other places than her walls, she began to see the true potential to an all white wall colour. By simply adding pops of colour to the room with artwork, accessories, and colourful accent cushions, an all white room can become very warm & inviting, and visually interesting.

Here are some beautiful rooms that I found showing the beauty of an all white wall colour when paired with colourful accent pieces:


As you can see in this room, the accessories and floral arrangement adds colour and life to this sitting room.


Visual interest and excitement is added to this room  with these funky zebra print chairs and a pop of vibrant fushia is added with the large accent cushions.


Doesn't this bedroom look clean and cozy? The white walls reflect and softens the natural light that comes through the windows, creating a warm and cozy atmosphere, while the art work on the walls and the coverlet on the edge of the bed liven up the room with a punch of color.


This bright and clean white kitchen uses colourful breakfast bar stools and fresh flowers and plants to bring life and vibrancy to the room.


As you can see, having all white walls may seem scary at first, but can be quite interesting and appealing.


Take Care,

Leanne.

Thursday, May 9, 2013

Banana Bread Smoothie {Protein Shake}

After making my delicious banana bread last week, I have to admit I'm on a banana kick.
So I thought I would share with you one of my favourite protein packed smoothies, that tastes just like banana bread.


Ingredients:
1tsp Ground Cinnamon
2 fl oz Soy Milk (or Skim Milk)
1 scoop Vanilla (or Chocolate) Protein Powder
2 1/2 tsp Peanut Butter (or if you're allergic to peanuts, almond butter)
1/2 tsp Vanilla Extract
2 tbsp Sliced Raw Banana
1 cup Water

Instructions:
Add all ingredients to blender and blend until smooth, adding water gradually until your desired thickness is achieved. 

This is an awesome breakfast or post-workout smoothie. I hope you like it as much as I do.

Take Care,

Leanne.

Wednesday, May 8, 2013

Let It Burn {Pilates Inspired Leg Workout}

For many people (women in particular), tightening and toning the inner thighs is a priority in the gym. Growing up I used to do a strict pilates regiment in my living room 5 days a week, toning my legs, abs, and upper body. My favourite routine was for the lower body and legs; you could really feel every muscle working, an boy oh boy did it burn.

When searching for the newest leg workout to add to my little black workout book, I came across this routine that incorporates many of my favourite pilates exercises:


Give it a try, and feel it burn!

Take Care,

Leanne.